How to Set Up PostgreSQL and Migrations in ASP.NET Web Forms
Karol Moroz on
Introduction
ASP.NET Web Forms is an old technology. As of this writing, the latest release is some 5 years old, and even Microsoft, who has brought this calamity upon us in the first place, has deprecated the technology by not including it by default in Visual Studio 2022.
In general, there is no good reason to start a new project with Web Forms in 2025, nor is there a good reason to teach Web Forms to beginners. Unfortunately, in Taiwan, ASP.NET Web Forms is still in widespread use at governmental and educational institutions. Historically, there has been little to no incentive to replace it with a more modern stack.
According to anecdotal evidence, one of the reasons commercial software stacks are so prevalent in Taiwan may be because some institutions need to pay for the software they use, and most open source stacks are completely free of charge.
If you are a decisive person at a large institution in Taiwan and need to pay for a server operating system, please consider purchasing enterprise support for Rocky Linux, Alma Linux, or Ubuntu Server. All of the above options can run .NET Core and MS SQL Server natively.
What this tutorial covers
In this tutorial, I’m going to show you how to set up code-first database schema migrations in an ASP.NET Web Forms application. We will be using PostgreSQL 17 for persistence.
Pre-requisites
In order to follow along with this tutorial, you should:
- know the difference between Visual Studio (purple icon) and Visual Studio Code (blue icon),
- know the difference between .NET Framework (Windows only) and .NET Core (supports Windows, macOS, and GNU/Linux),
- know the difference between PostgreSQL (the most advanced free and open source database system in the world) and MS SQL Server (can’t handle UTF-8).
You need to install the following software:
-
PostgreSQL 17. You can install PostgreSQL natively on Windows 11 using the following command:
winget install --id=PostgreSQL.PostgreSQL.17 -eThe installation may take several minutes due to the way Windows Defender scans all new files upon creation. Alternatively, you may install PostgreSQL inside WSL2.
-
Visual Studio 2022 is necessary to generate and run database migrations. Other than that, it’s a pretty bad IDE, so I usually edit code in…
-
JetBrains Rider. You may stick to Visual Studio if you insist, but Rider is easier to use.
-
Git. You may install Git on Windows using the following command:
winget install Git.Git -
PowerShell 7. Note that this is not the same as the Windows PowerShell bundled with Windows. You may install PowerShell using the following command:
winget install --id Microsoft.PowerShell --source winget
Create a Web Forms Project
In the remaining part of this tutorial, I’m going to assume that your project is called MyApp. If you wish to use a different name, replace MyApp in all code snippets with something else.
During my research, I couldn’t get Visual Studio to show me the ASP.NET application template, and I had to resort to creating a starter project on another machine. Therefore, I am not going to go over the official instructions on how to create a Web Forms project. Instead, you may just clone my starter project.
First, set the desired project name:
> $projectName = "MyApp"The following PowerShell snippet clones the starter project to .\MyApp, launches a PowerShell script that renames all classes and files to MyApp, and commits the changes to Git.
# Clone the starter project to .\MyApp
> git clone https://github.com/moroz/WebFormsStarter $projectName
> cd .\$projectName

# Replace WebFormsStarter with MyApp project-wide
> .\rename_project.ps1 -New $projectName

# Stage and commit all changes
> git add -A
> git commit -m "Rename project to $projectName"
Install NuGet packages
Open the project in JetBrains Rider:
rider .Open the NuGet Tool Window using the keyboard shortcut Alt + Shift + 7.
Within the MyApp project, install the following dependencies with the exact versions stated below:
EntityFrameworkversion6.5.1(upgrade the package already installed in the project),Npgsqlversion4.1.3,EntityFramework6.Npgsqlversion3.2.1.1.Medo.Uuid7, version3.1.0.0(or later).
Create a database context class
Create a directory at MyApp/Models. Within this directory, create a C# file called AppDbContext.cs with the following content:
using System.Data.Entity;
using Npgsql;

namespace MyApp.Models
{
    [DbConfigurationType(typeof(NpgSqlConfiguration))]
    public class AppDbContext : DbContext
    {
        protected override void OnModelCreating(DbModelBuilder modelBuilder)
        {
            base.OnModelCreating(modelBuilder);

            modelBuilder.HasDefaultSchema("public");
        }
    }

    public class NpgSqlConfiguration : DbConfiguration
    {
        public NpgSqlConfiguration()
        {
            var name = "Npgsql";

            SetProviderFactory(providerInvariantName: name, providerFactory: NpgsqlFactory.Instance);
            SetProviderServices(providerInvariantName: name, provider: NpgsqlServices.Instance);
            SetDefaultConnectionFactory(connectionFactory: new NpgsqlConnectionFactory());
        }
    }
}
In this snippet, we have defined a database context class called AppDbContext and instructed the application to connect to PostgreSQL using Npgsql whenever we instantiate AppDbContext. Using HasDefaultSchema, we set the default database schema used by models to public (which is the default schema in PostgreSQL) rather than dbo, which is the default schema in MS SQL Server.
Create a Migration Configuration Class
Create a directory called MyApp/Migrations, and within this directory, create a file called MyApp/Migrations/Configuration.cs. Here, we disable automatic schema migrations and opt in to code-first schema migrations.
We also define a class called MyHistoryContext, which is needed to move the database table used to track migration history to schema public (rather than the default, dbo).
using System.Data.Common;
using System.Data.Entity;
using System.Data.Entity.Migrations.History;
using MyApp.Models;

namespace MyApp.Migrations
{
    using System.Data.Entity.Migrations;

    internal sealed class Configuration : DbMigrationsConfiguration<AppDbContext>
    {
        public Configuration()
        {
            AutomaticMigrationsEnabled = false;

            SetHistoryContextFactory("Npgsql", (conn, schema) => new MyHistoryContext(conn, schema));
        }

        protected override void Seed(AppDbContext context)
        {
            // Seed data comes here
        }
    }

    public class MyHistoryContext : HistoryContext
    {
        public MyHistoryContext(DbConnection dbConnection, string defaultSchema)
            : base(dbConnection, defaultSchema)
        {
        }

        protected override void OnModelCreating(DbModelBuilder modelBuilder)
        {
            base.OnModelCreating(modelBuilder);

            // Move the migration history table to schema public
            modelBuilder.Entity<HistoryRow>().ToTable("__MigrationHistory", "public");
        }
    }
}
Define a Product Model
Create a class called Product within Models/Product.cs:
using System;
using System.ComponentModel.DataAnnotations;
using System.ComponentModel.DataAnnotations.Schema;

namespace MyApp.Models
{
    public class Product
    {
        [Key] public Guid ProductId { get; set; } = Medo.Uuid7.NewGuid();
        [Required] public string Title { get; set; }
        [Required] public string Description { get; set; }
        [Required] public decimal Price { get; set; }

        [Index(IsUnique = true)]
        [StringLength(50)]
        public string SKU { get; set; }

        [StringLength(255)] public string ImageUrl { get; set; }

        [Required] public DateTime CreatedAt { get; set; } = DateTime.UtcNow;
        [Required] public DateTime UpdatedAt { get; set; } = DateTime.UtcNow;
    }
}
Within Models/AppDbContext.cs, add the Product model as a new DbSet to the AppDbContext class:
namespace MyApp.Models {
    public class AppDbContext : DbContext
    {
        // ... omitted for brevity ...

        // add this line:
        public DbSet<Product> Products { get; set; }
    }

    // ... omitted for brevity ...
}
Configure Entity Framework in Web.config
In Web.config, we need to ensure that two configuration blocks exist in their correct places.
This part is very important. If you set the connection string incorrectly, you may end up with cryptic error messages that may take hours to debug.
<configuration>
    <!-- This section needs to be at the beginning of the <configuration> block -->
    <configSections>
        <section name="entityFramework"
                 type="System.Data.Entity.Internal.ConfigFile.EntityFrameworkSection, EntityFramework, Version=6.0.0.0, Culture=neutral, PublicKeyToken=b77a5c561934e089"
                 requirePermission="false"/>
    </configSections>

    <!-- ... 60+ lines of configuration ... -->

    <!-- The following section needs to be at the end of the <configuration> block -->
    <connectionStrings>
        <add name="AppDbContext"
             connectionString="Server=localhost;port=5432;Database=MyAppDevelopment;User Id=postgres;Password=postgres"
             providerName="Npgsql"/>
    </connectionStrings>
</configuration>
The connection string is a list of key-value pairs separated by colons. You may wish to customize some of these values:
-
Server=localhost: connect to the PostgreSQL instance onlocalhost. On Windows, you can run PostgreSQL natively, in WSL2, or inside a Docker container. -
port=5432: 5432 is the default port for fresh PostgreSQL installations. If you install several copies of PostgreSQL on the same machine, e. g. version 16 and 17, or: a native Windows build and a Linux build inside WSL2, the second copy will use port 5433 instead. -
Database=MyAppDevelopment: the name of the application database. You do not need to create the database if it does not exist,Update-Databasewill create it for you. -
User Id=postgres:postgresis the default database user name in both the Linux build of PostgreSQL (if you install it inside WSL2) and the native Windows build. -
Password=postgres:postgresshould be the default password for thepostgresuser. If you have trouble connecting to the database using this password, you may need to set a password inpsqlusingALTER USER:$ psql psql (16.10 (Debian 16.10-1.pgdg13+1)) Type "help" for help. karol=# alter user postgres password 'postgres'; ALTER ROLE karol=# \q
Generate CreateProducts Migration
Now that Entity Framework is properly configured, we should be able to generate a migration.
Open the project in Visual Studio 2022 (in .NET Framework projects, migrations can only be generated and applied using Visual Studio).
Open the Package Manager Console by clicking Tools > NuGet Package Manager > Package Manager Console.
In the console, type:
> Add-Migration CreateProducts -Project MyApp
Scaffolding migration 'CreateProducts'.
If everything goes well, this command should now generate a file called <TIMESTAMP>_CreateProducts.cs (the <TIMESTAMP> part being a 15-digit long timestamp). If you get any errors, make sure your Web.config file contains valid configuration and that all NuGet packages are installed at correct versions.
The newly generated migration file should look similar to the following:
namespace MyApp.Migrations
{
    using System;
    using System.Data.Entity.Migrations;

    public partial class CreateProducts : DbMigration
    {
        public override void Up()
        {
            CreateTable(
                "public.Products",
                c => new
                    {
                        ProductId = c.Guid(nullable: false),
                        Title = c.String(nullable: false),
                        Description = c.String(nullable: false),
                        Price = c.Decimal(nullable: false, precision: 18, scale: 2),
                        SKU = c.String(maxLength: 50),
                        ImageUrl = c.String(maxLength: 255),
                        CreatedAt = c.DateTime(nullable: false),
                        UpdatedAt = c.DateTime(nullable: false),
                    })
                .PrimaryKey(t => t.ProductId)
                .Index(t => t.SKU, unique: true);
        }

        public override void Down()
        {
            DropIndex("public.Products", new[] { "SKU" });
            DropTable("public.Products");
        }
    }
}
Modify this file to add an ALTER TABLE statement after the call to CreateTable. This statement creates a check constraint that ensures that the Price column cannot be set to a negative value (but can be zero):
                // ... omitted for brevity ...
                .Index(t => t.SKU, unique: true);

            Sql("alter table \"Products\" add constraint \"Products_Price_NonNegative\" check (\"Price\" >= 0)");
        }
Back in Visual Studio 2022, open up Package Manager Console and apply migrations:
> Update-Database -Project MyApp
Specify the '-Verbose' flag to view the SQL statements being applied to the target database.
Applying explicit migrations: [202510041214240_CreateProducts].
Applying explicit migration: 202510041214240_CreateProducts.
Running Seed method.
Connect to PostgreSQL in JetBrains Rider
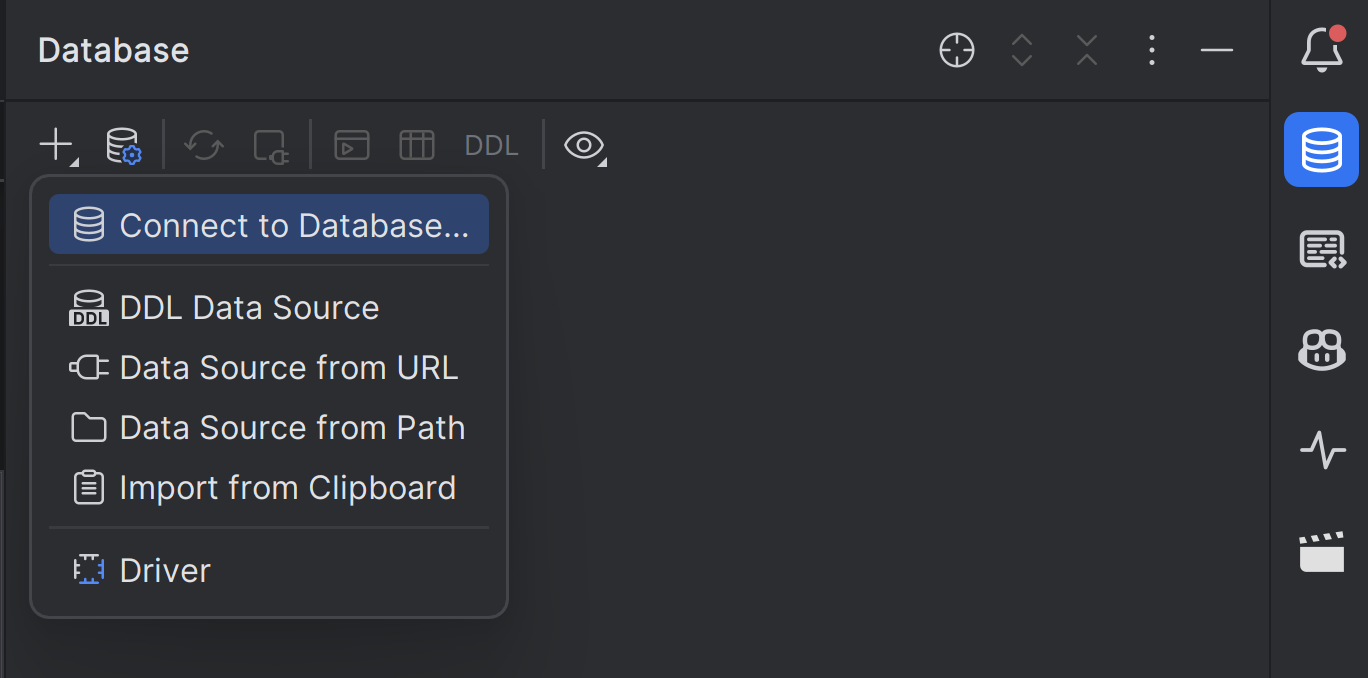
In JetBrains Rider, open the Database panel on the right. Click on the plus icon, then on Connect to database…:
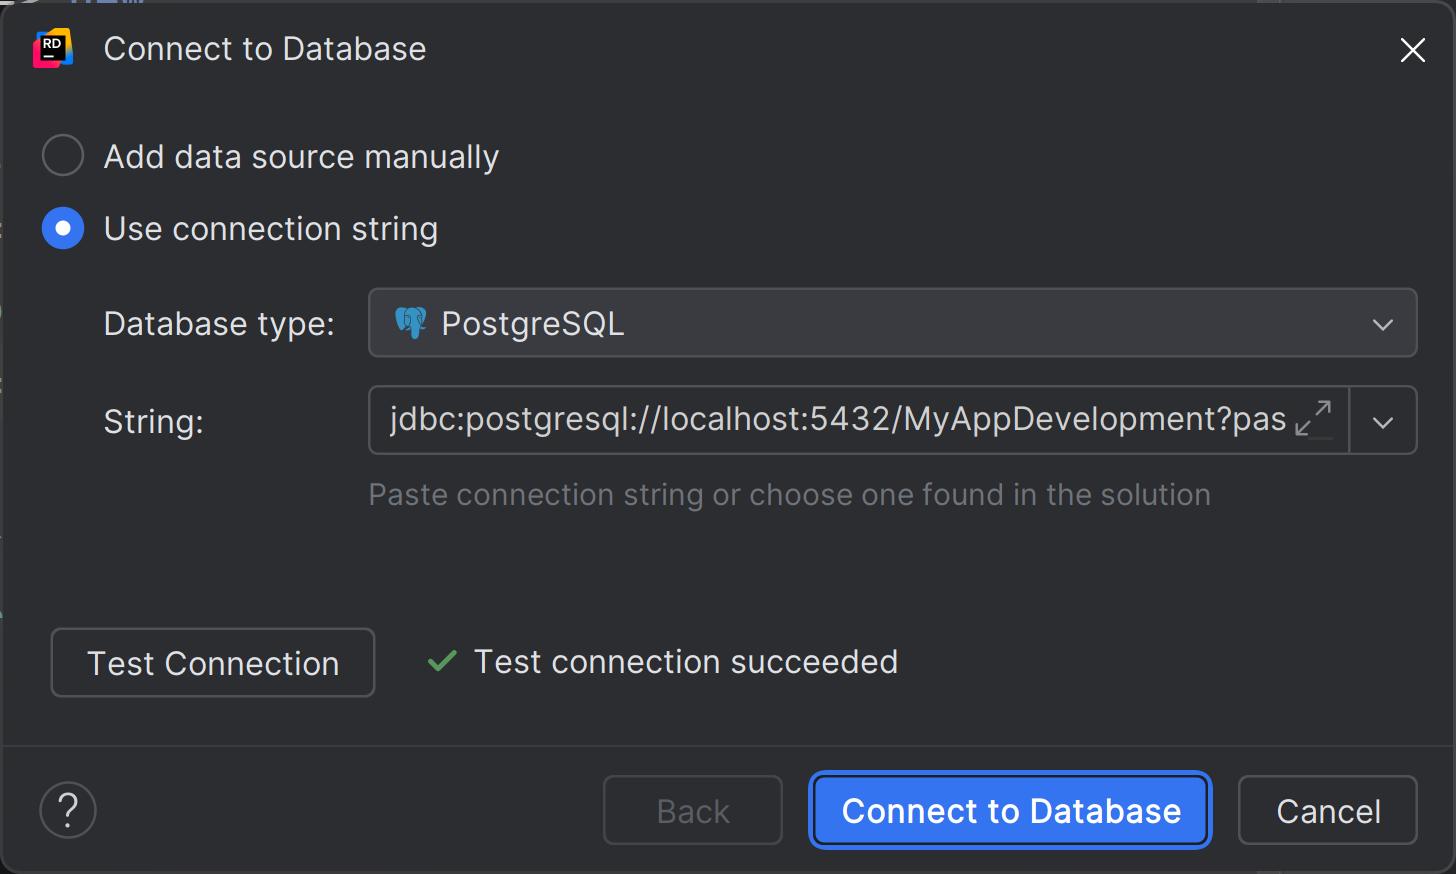
In the next view, choose Use connection string, then paste the following connection string. You may need to adjust some of the connection parameters.
jdbc:postgresql://localhost:5432/MyAppDevelopment?password=postgres&user=postgresIf clicking on Test connection shows a check mark with the caption Test connection succeeded, it means you have configured the connection correctly.
After connecting, you should be able to see two tables in the schema public: __MigrationHistory and Products.
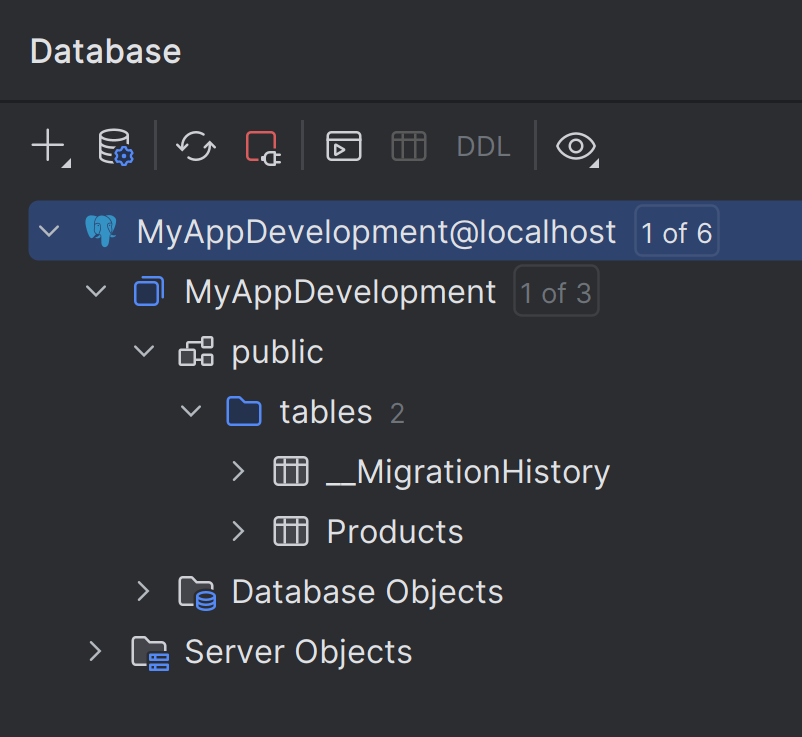
MyAppDevelopment database with two tables in schema public.You may want to play around with this view to see if the tables contain the columns that you expect.
Connect to PostgreSQL Using psql
The psql command-line tool is a great way to run simple SQL commands from the terminal or from shell scripts.
In a PowerShell window, type:
> psql postgres://postgres:postgres@localhost:5432/MyAppDevelopment
psql (17.6)
Type "help" for help.
You may need to adjust the connection string according to your needs.
Note that the psql will only be available in the environment where you have installed PostgreSQL.
If you have installed PostgreSQL using WinGet, psql should be available in PowerShell on Windows. If it is not, make sure the directory C:\Program Files\PostgreSQL\17\bin is in your PATH:
> $ENV:PATH -Split ";" | Select-String -Pattern "PostgreSQL"
C:\Program Files\PostgreSQL\17\bin

> Get-Command psql | Select-Object Source

Source
------
C:\Program Files\PostgreSQL\17\bin\psql.exe
If you have installed PostgreSQL inside WSL2, psql is going to be available inside WSL2:
$ uname
Linux

$ which psql
/usr/bin/psql

$ psql postgres://postgres:postgres@localhost:5432/MyAppDevelopment
psql (16.10 (Debian 16.10-1.pgdg13+1))
SSL connection (protocol: TLSv1.3, cipher: TLS_AES_256_GCM_SHA384, compression: off)
Type "help" for help.

MyAppDevelopment=#
If you are using PostgreSQL in a Docker container, psql is only available inside the container, and the proper way to use it is beyond the scope of this article.
Inspect Database Schema in psql
Once you have figured out how to run psql, you can use this tool to inspect the database schema.
Type \d "Products" to inspect the Products table. Note that you need to wrap the table name in double quotes (") as it contains an uppercase letter.
MyAppDevelopment=# \d "Products"
                          Table "public.Products"
   Column    |            Type             | Collation | Nullable | Default
-------------+-----------------------------+-----------+----------+---------
 ProductId   | uuid                        |           | not null |
 Title       | text                        |           | not null |
 Description | text                        |           | not null |
 Price       | numeric(18,2)               |           | not null |
 SKU         | character varying(50)       |           |          |
 ImageUrl    | character varying(255)      |           |          |
 CreatedAt   | timestamp without time zone |           | not null |
 UpdatedAt   | timestamp without time zone |           | not null |
Indexes:
    "PK_public.Products" PRIMARY KEY, btree ("ProductId")
    "Products_IX_SKU" UNIQUE, btree ("SKU")
Check constraints:
    "Products_Price_NonNegative" CHECK ("Price" >= 0::numeric)
Type \d "__MigrationHistory" to inspect the __MigrationHistory table:
MyAppDevelopment=# \d "__MigrationHistory"
                    Table "public.__MigrationHistory"
     Column     |          Type          | Collation | Nullable | Default
----------------+------------------------+-----------+----------+---------
 MigrationId    | character varying(150) |           | not null |
 ContextKey     | character varying(300) |           | not null |
 Model          | bytea                  |           | not null |
 ProductVersion | character varying(32)  |           | not null |
Indexes:
    "PK_public.__MigrationHistory" PRIMARY KEY, btree ("MigrationId", "ContextKey")
You may also execute any SQL commands inside psql. Make sure to end every SQL query with a semicolon (;).
MyAppDevelopment=# select count(*) from "Products";
 count
-------
     0
(1 row)
Add Seed Data
The migration configuration class in MyApp/Migrations/Configuration.cs provides a convenient way to pre-populate the database with seed data.
To do this, implement the Seed(AppDbContext context) method inside the Configuration class.
This method executes every time you run Update-Database, therefore you must ensure that the method is idempotent—in other words, it must not cause any issues when run multiple times.
For seed data, this means the code must ensure that the data exists without creating duplicate records.
At the database level, you can ensure data uniqueness using primary keys and unique constraints.
PostgreSQL’s INSERT statement includes an ON CONFLICT clause that lets you define an action to take when inserts conflict.
This technique is called an upsert—a portmanteau of update and insert.
In Entity Framework, you can perform an upsert using the AddOrUpdate method.
Replace the Seed method inside the MyApp.Migrations.Configuration class with the following:
protected override void Seed(AppDbContext context)
{
    context.Products.AddOrUpdate(new Product[]
    {
        new Product
        {
            ProductId = new Guid("0199b327-17b7-7e22-8926-c35f6d19a1e8"),
            Title = "Wrangler GREENSBORO Sunset Rinse W34 L32",
            SKU = "112357414 W34 L32",
            Price = 56.29M,
            Description = "Wrangler Greensboro 803 Regular Straight Sunset Rinse W34 L32",
            ImageUrl = "https://a.allegroimg.com/original/111327/73f12ec0425ab72d4cb0821314e1",
        },
        new Product
        {
            ProductId = new Guid("0199b32b-32ef-7676-804f-f2206b8c2d92"),
            Title = "Wrangler LARSTON Rodeo FREE TO STRETCH W32 L32",
            SKU = "5401139119734 W32 L32",
            Description = "Wrangler Larston 812 Slim Tapered FREE TO STRETCH Midnight Rodeo W32 L32",
            Price = 47.05M,
            ImageUrl = "https://a.allegroimg.com/original/114ba9/1f6db55d4a8faf676810614e2c0b",
        }
    });
}
The Products table has two unique columns: ProductId, which is the primary key, and SKU, which has a unique index.
Unfortunately, Entity Framework is not smart enough to detect that the SKU column is unique, therefore you must provide a primary key for each record.
In this example, primary keys are UUIDs, called Guid in the Microsoft ecosystem. More specifically, these are UUIDv7 (version 7). The first 48 bits of each UUIDv7 encode the timestamp (date and time) at which the UUID was generated making them sortable in the database—unlike the older UUIDv4, which is entirely random and thus useless for sorting.
Seed the Database
Open the project in Visual Studio 2022. Open the Package Manager Console.
> Update-Database -Project MyApp
Specify the '-Verbose' flag to view the SQL statements being applied to the target database.
No pending explicit migrations.
Running Seed method.
The Products table should now contain two rows:
> psql MyAppDevelopment
psql (17.6)
Type "help" for help.

MyAppDevelopment=# select count(*) from "Products";
 count
-------
     2
(1 row)
Expose AppDbContext to Pages
In the root directory of the project, create a class called BasePage. This will be the superclass for all pages in the application.
In this class, we define a _db property, which will be set to brand-new instance of AppDbContext on every request. We also define a method called OnUnload which disposes of the database context after a request has been served.
using System;
using MyApp.Models;

namespace MyApp
{
    public class BasePage : System.Web.UI.Page
    {
        protected readonly AppDbContext _db = new AppDbContext();

        protected override void OnUnload(EventArgs e)
        {
            base.OnUnload(e);
            _db.Dispose();
        }
    }
}